“In software testing, the earlier a bug is found, the cheaper it is to fix.”
Karen N. Johnson
Testing software is a vital component to developing any application. Writing software is difficult, and after the ubiquitous “hello world” application, almost nothing runs perfectly the very first time it is written. To make software function correctly, developers need to run the code and see what it does and compare that with what it is expected to do. If it is doing something unexpected or incorrect, the code is refactored and tested again. This process repeats until the code does what the developer expects it to do.
While it is impossible to prove that an application or codebase is completely bug free, a variety of different techniques and best practices can be used to improve software quality. There are many types of tests in the software development process, and they are all intended to ensure some aspect of accurate functionality and quality in the application being developed. Generally, testing techniques can be grouped into two categories, functional and non-functional testing, and most of these can be done in a black box or white box environment.
Functional testing is a category where testers evaluate the software system against the functional requirements or specifications. It involves testing the application’s user interface, application programming interfaces (APIs), database, security, client/server communications, and other functionality to ensure it works as expected. Key types include:
Debugging: Pausing the code execution while running in the developer environment and examining the values of different variables and the state of different objects. This lets the developer compare the actual state of the application to the expected state while developing the software.
Unit Testing: Testing individual units or components of the software, such as objects, methods, or functions to verify they work correctly by themselves. This is done by writing test code that will test the application code and has the advantage of being very easy to re-run once created. Applications tend to have many small unit tests.
Integration Testing: Testing how different units or components of the software work together as a group. While unit tests may pass for each individual unit, integration testing makes sure the components work together correctly. Applications tend to have fewer but more involved or complex integration tests.
System Testing: Testing the fully integrated software system to evaluate if the application meets the requirements.
Acceptance Testing: Final testing by users or customers to validate the system meets their requirements before deployment.
Non-functional testing is a category where testers evaluate the system’s non-functional attributes like performance, usability, reliability, and security. Common types are:
Performance Testing: Testing to determine how the system performs under a specific workload, such as measuring response times, throughput, etc.
Load Testing: Testing the system’s behavior when several users access it at the same time.
Stress Testing: Testing the system under extreme workloads to determine its stability and robustness.
Usability Testing: Evaluating the user experience and ease of use of the application’s interface. This is especially useful if the application needs to integrate accessibility technologies.
Security Testing: Testing to identify potential security vulnerabilities and verify security requirements.
Other testing types also exist, and often involve using a combination of existing functional and nonfunctional tests in conjunction. These include:
Regression Testing: Testing to ensure changes or updates did not break existing functionality. This is most often done by re-running unit and integration tests when refactoring existing or adding new functionality.
Smoke Testing: Basic testing to ensure the core functionality of an application is working before proceeding with further testing. Think of the term, “Where there’s smoke, there’s fire.”
Exploratory Testing: Unscripted testing where testers explore the software to identify defects without a pre-defined test plan. This is often the purpose behind beta testing, where the software is released to a limited group of users before the full public release.
Compatibility Testing: Testing how the application performs on different hardware, operating systems, browsers, etc.
Ad hoc Testing: Random testing with no pre-defined test cases or test plan. Like exploratory testing, this is best done with actual end users or people who were not involved in writing the application.
Everything after integration testing can be done in a black box or white box fashion. Black box testing has the testers treat the software as a “black box” and test the end user functionality without considering the internal source code or code comments. White box testing on the other hand has the testers look at the internal workings and code structure of the software system as they test.
Black Box Testing:
Evaluates the functionality of the software system without knowledge of its internal structure, code, or implementation details. In other words, the testers do not have access to the source code, only a deployment of the application.
Tests are based on the software’s specifications and requirements.
Focuses on the system’s inputs and outputs, user interface, and overall behavior from the end user’s perspective.
Common techniques include equivalence partitioning, boundary value analysis, decision table testing, and state transition testing.
Does not require knowledge of programming languages or source code.
Typically performed by testers or quality assurance professionals.
White Box Testing:
Examines the internal structure, design, and implementation of the software system, including the source code.
Tests are derived from the program’s logic, code statements, branches, conditions, and data flows.
Focuses on validating the internal paths, loops, data structures, exception handling, and security aspects of the code.
Common techniques include statement coverage, branch coverage, path coverage, and control flow testing.
Requires in-depth knowledge of programming languages and the application’s codebase.
Typically performed by developers or testers with coding expertise.
A combination of both approaches is often used to achieve comprehensive testing coverage.
Code Coverage
Code coverage is a way of measuring how much of the source code of a program is executed or “covered” by a test suite. It provides insights into the effectiveness and comprehensiveness of the tests by quantifying the amount of code that is exercised during testing. 100% coverage is almost always impossible, because of the difficulty of programmatically testing user interface code or auto-generated code. Most organizations consider 70% to 80% test coverage to be effective.
Code coverage is an important metric for several reasons, including helping to identify untested code, helping gauge if the suite of tests is comprehensive, guiding where to focus testing efforts, and regression testing in software evolution and maintenance. While high code coverage is desirable, it does not guarantee the absence of defects or ensure complete software quality. Code coverage should be used in conjunction with other testing techniques and quality metrics for a comprehensive software testing strategy.
Code Comments and Documentation
Software comments and documentation serve several crucial purposes in software development. Creating and especially maintaining these is not fun, but it is vital to the long-term quality and functionality of the application and code base.
Comments
In Java, all public and protected classes and methods should use the Javadoc standard. These code comments are embedded directly into source code and should focus on explaining what the class or method is doing. When done correctly, they help enhance code readability by providing explanations and context for the way a part of the application is implemented. They also help developers collaborate when working on a team. In addition, they can help explain the rationale for using a given approach when solving a problem. Javadoc comments can be processed into a set of static web pages, which can then be read in a web browser. For all these reasons, reading code comments is a great place to start when debugging code that a developer either did not write themselves or that they wrote long enough ago that they’ve forgotten key parts of it.
Single line or multi-line comments inside a method or class should explain how the code is solving the problem if it is ambiguous or provide other insight into the way the code is written. Obvious comments do not add anything of value.
An example of a useless comment would be // This is a print statement right after a System.out.print() call. This adds nothing to the understanding of the code.
A useful comment though would explain why something is being done, such as calling a merge sort method and then commenting it with // Merge sort has the best performance
Documentation
Software documentation on the other hand is not embedded in the source code. This documentation can be in the form of a user manual, requirements document, or something similar. User manuals are generally created to help with the training and onboarding of new people who will use the software. Other documents are often created to help provide knowledge transfer. If it is properly maintained, it can be a valuable place to start before diving into testing to get a better understanding of what the software is supposed to do.
Both code comments and software documentation play vital roles in enhancing code quality, facilitating collaboration, enabling knowledge transfer, and ensuring the long-term maintainability and evolution of software projects.
All these reasons make code comments and documentation a great place to start when debugging or testing a new piece of code if a developer didn’t write the code themselves.
Debugging Code
Debugging in software development refers to the process of identifying, analyzing, and resolving defects or errors (known as “bugs”) in application code. Debugging is most often done during the process of writing software by the developer, and it is the main process used to refine the first draft of an application into the final form of the code.
There are several aspects to the art of debugging:
Detecting and reproducing bugs: Developers first identify the existence of a bug by observing unexpected behavior, crashes, or invalid outputs in the software. They then attempt to consistently reproduce the bug to understand its nature and the conditions that trigger it.
Locating the source of the bug: Once the bug is reproducible, developers use various techniques and tools to pinpoint the specific section of code or component responsible for the issue.
Analyzing the code: With the bug’s location identified, developers work to understand the cause of the bug by reading the surrounding code to understand the logic, data structures, and control flow. With that, a developer can understand the root cause of the problem.
Fixing the bug: After identifying the root cause, developers implement the necessary changes to the code to resolve the issue. This may involve modifying logic, correcting syntax errors, adjusting variables or parameters, or applying other programming techniques.
Testing and verification: Once the bug is fixed, developers thoroughly test the modified code to ensure the resolution is effective and has not introduced new issues. This often involves regression testing to verify the fix’s impact on other parts of the software.
Debugging is an essential part of the software development process as it helps ensure the quality, reliability, and functionality of software applications. It is an iterative process that may require multiple attempts to identify and resolve all bugs, especially in complex systems.
Detecting and Reproducing Bugs
Developers typically detect and reproduce bugs through one of a few methods. First and most common is observing unexpected behavior or errors when the code runs. Developers may notice a bug when the software has some unexpected behavior, when the software crashes, or produces incorrect outputs during development, testing, or user reports.
Once a potential bug is identified, developers try to reproduce it consistently by repeating the steps or conditions that first caused the bug to be identified. This helps confirm the bug’s existence and understand the circumstances that trigger it. Sometimes bugs are intermittently reproduced, making the process significantly more difficult to troubleshoot.
Locating the Source of the Bug
Once a bug is reproducible and verified, developers use various debugging tools and techniques to locate the source of the bug and understand its root cause. These may include:
Manual Walkthroughs: This is the decidedly low-tech but effective process of reading through the code and using a whiteboard, pen and paper, or your memory and tracking what the code logic would do as it runs.
Debuggers: A debugger is a key part of an integrated developer environment (IDE) and allows the developer to set breakpoints in the code. When the code is executing inside the IDE and gets to a breakpoint, execution will pause and allow the developer to look at the current state of all objects and variables. From there, the developer can step through the code line by line or run to the next breakpoint. This provides a clean and effective way to monitor variable values and trace execution flow to pinpoint the issue.
Logging and tracing: Insert logging statements or use tracing tools to capture detailed information about the program’s execution, data flow, and state changes. Logging is a very useful tool because it allows the developer to review information after the code has been executed. Logs are typically written to files or a similar destination, although another common if less useful technique is to simply print debugging messages to the console. Some of the most popular libraries to do this include java.util.Logging, Logback, SLF4J, or Log4j2.
Profilers: Analyze performance metrics, memory usage, and resource consumption to identify bottlenecks or anomalies that may indicate bugs. These tend to be used not when the application is creating invalid output, but rather when the application is performing poorly. In Java, the Flight Recorder tool is available to do this.
Analyzing the Code
To understand the cause of a bug, developers carefully read the source code and its logic, data structures, and control flow around the suspected bug’s location in source code. It is often helpful to also review code comments and related documentation, application requirements, and test cases to understand the expected behavior and identify what is not working as expected. This step requires a deep understanding of the code and the assumptions made during its development. Being familiar with the existing documentation and code comments can be very helpful in this step.
Running the debugger
Developer environments such as IntelliJ include very good debugging tools.
There are several ways to start the debugger in IntelliJ:
Click on the Run icon in the gutter area and select the Debug option
Press Alt + Enter with the cursor on the class or main method and choose the Debug action
Start the debugger from the Run menu, or by pressing Shift + F9
Edit the Run configuration to add Virtual Machine options or to pass arguments to the program
Once the debugger is started, it will continue until the application is paused by the debugger, hits a breakpoint, or completes execution. When troubleshooting code that is not doing what is expected, a developer will typically set a breakpoint on a line of code before the code suspected of causing the problem. This pauses the execution of the code when it reaches the line with the breakpoint. The state of the variables can all be inspected while the code is paused at this point.
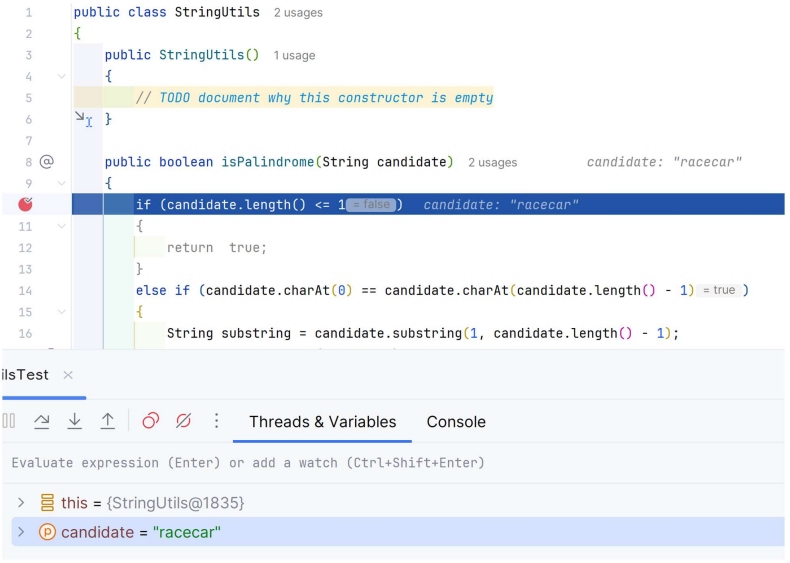
To set a breakpoint, click on the gutter (the left margin area) next to the line of code where you want the execution to pause. Alternatively, place the cursor on that line and press Ctrl+F8 (Windows/Linux) or Cmd+F8 (macOS). A red dot will appear in the gutter, indicating that a breakpoint has been set on that line. Now when the debugger is started it will pause on this line.
Figure 3.1 – IntelliJ debugger at a breakpoint
In the bottom pane, the debugger shows the current variables in use. The one labeled *this* is the instance of the class being debugged. Clicking on the > next to a variable or class will expand the debugger display and show its current value or state. The buttons directly above this provide ***step commands*** to the debugger for its operation.
Figure 3.2 – Step command buttons in IntelliJ
The first button (a green triangle) is the ***play*** button and will resume executing the application and continue to the next breakpoint or to program completion. The F9 key on the keyboard also does this.
The second button is the ***pause*** button and will be available if the application is running but not paused already. The next three buttons control how the debugger will continue executing the code in a step-by-step manner.
The first of these buttons, with the arrow angled up then down, will cause the debugger to ***step over*** the code one line at a time. This can also be done by pressing the F8 key on the keyboard. This means the debugger will call a method and get the return value without taking you into that method and pausing on each line there.
The second button, with the arrow pointing down is the ***step-into*** button. This will cause the debugger to go into any called methods and run them one line at a time until the method returns, then continues line by line in the original method. The functionality of this button can also be done by pressing the F7 key on the keyboard.
The third button with the arrow pointing up is the ***step-out*** button. This causes the debugger to skip stepping through code line by line and simply returns to the calling method. The called method executes, but without stepping through each line of code in it. This is handy for getting out of step-into sometimes.
In each case, the developer can watch the variables and objects used by the code and observe how they change as each line of the code executes. These are all displayed in the variables pane as shown in the breakpoint image above. Simply right-click on a variable and select Jump To Source (F4) to view where it was declared, or select the option Jump To Type Source (Shift+F4) to view the class definition of objects.
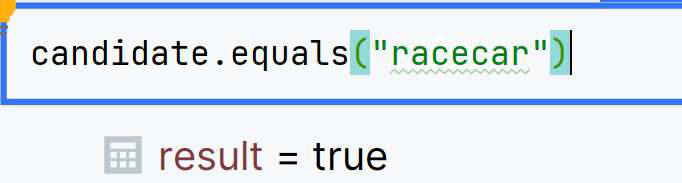
Evaluating expressions is possible without re-writing and re-running code as well. Directly above the step buttons in the variable pane is an ***Evaluate expression*** text box. Expressions can be typed into this, and the result will be displayed in the variable pane, like this example testing a String instance for equality:
Figure 3.3 Evaluate expression text box in IntelliJ
It is also possible to change the behavior of the code while it is running. This applies to the code defined by another API or framework as well. To change the value of a variable just right-click it in the variable pane and select ***Set Value...*** . This opens a text box with the current value and allows the developer to replace the runtime value with a new value. This is a good way to update the value quickly to what might fix the bug and see if it does.
By going through line by line it is possible to watch the path of execution and compare each line's actual result with the expected result which helps isolate the problem.
#### Environment Issues
Developers may attempt to reproduce the bug on different operating systems, hardware configurations, or environments to gather more information and isolate potential environmental factors. Frequently the environment the software is created in is not the same environment the code is deployed on. For instance, code written on Windows workstation with IntelliJ may be deployed to a Linux machine running Apache Tomcat. Sometimes these different environments can be the source of a bug.
This is the problem that container technologies such as Docker try to solve. It is also why Java uses a Runtime Environment to execute code.
Developers often collaborate with other team members such as testers or end users who reported the bug. Working closely with others often helps gather additional details, reproduce the issue, and share insights or debugging strategies. It is important for a developer to not let pride get in the way and prevent asking for help. Fresh eyes will see things that a developer will look past after working on a problem for a long time. Always remember that everyone wins when the bug is fixed.
Automated tests and continuous integration practices can help detect and reproduce bugs early in the development cycle, making it easier to identify and fix issues before they propagate further. With loose coupling it is unlikely that a change in one part of an application will cause another part to break, but it is not impossible. Being able to rerun a large body of software tests with the click of a button makes it much more likely that tests will be run and therefore makes it more likely that bugs will be found.
Effective bug reproduction is crucial for developers to understand the root cause, implement a proper fix, and prevent similar issues from occurring in the future. It requires a systematic approach, attention to detail, and the use of appropriate tools and techniques tailored to the specific software project and development environment. Sometimes a bug is quickly identified and sometimes the root cause can be very subtle and take a long time to identify. There is no way to predict this, which makes estimating the time it takes to fix a bug almost impossible.
## Fixing the Bug
After identifying the root cause, a developer implements the necessary changes to the code that they think will fix the issue. This may involve modifying logic, correcting syntax errors, adjusting variable declarations, data types or values, adjusting method parameters, or applying other programming techniques.
A few examples of bug fixes include:
- A test condition uses < instead of <= or > instead of >=, or vice versa.
- A test accidentally tests for out-of-bound ranges instead of in-bound ranges.
- Fixing an infinite loop.
- Fixing malformed data or other output.
- A return or break statement prevents code after it from executing.
- Declaring an object then re-assigning fields when different instances are needed.
- Passing a private array or object directly to another class.
- This would allow these private fields to be modified outside the original object since they are ***pass-by-reference***.
- Using static fields that could result in a race condition when accessed or modified in two or more places.
- Switching to a faster algorithm to improve runtime performance.
## Testing and Verification
Once a fix is applied, it is important to rerun all the tests that were used to identify and isolate the bug to make sure it is in fact fixed. Once the developer is confident it is fixed, rerunning all available tests is also important. This regression testing will help verify that this fix didn't break anything else that worked before the code was refactored.
Effective debugging requires a systematic approach, the use of specialized tools (such as debuggers, profilers, and logging mechanisms), and a deep understanding of programming concepts and the specific software being developed. Read and watch more about Debugging Basics with IntelliJ:
- [Debugging Code](https://www.jetbrains.com/help/idea/debugging-code.html)
- [Debugger Basics in IntelliJ IDEA](https://blog.jetbrains.com/idea/2020/05/debugger-basics-in-intellij-idea/)
- [Debugger Basics in IntelliJ IDEA (Video)](https://youtu.be/lAWnIP1S6UA)
# Unit Testing
***Unit testing*** is a practice that involves testing individual units or components of a code base in isolation. A "unit" is the smallest testable part of an application, usually a single method, branch of a method (if-else path) or class. The main purpose of unit testing is to validate that each unit of the software performs as expected and meets the requirements. It helps detect and isolate issues early in the development cycle, reducing the cost of fixing bugs and enabling easier code refactoring.
A unit test is a type of software test that focuses on testing individual components or units of a software product. It involves creating test cases that verify the behavior of a specific unit of code in isolation from the rest of the application.
This is done by writing separate code that will test the unit of the application in question. They may take a little bit of effort up front to create, but they have the advantage of being extremely quick and easy to re-run. This makes it more likely that these tests will be performed and therefore having unit tests is a reliable way to improve overall code quality.
## Characteristics of Unit Tests
Unit tests are intended to run individual units of code in isolation from other components or dependencies. They are typically written and executed by developers during the initial coding phase of creating an application. In fact, in the ***Test-Driven Development (TDD)*** model of software development, the tests are written before the actual code is developed! Unit tests attempt to validate that each unit of the code behaves as expected and meets its design requirements. Unit tests are easy and fast to re-run once created, which provides a way to automatically verify the correctness of code changes or refactoring.
Unit tests are created using a simple design pattern:
- **Arrange**: In this step a unit test will create instances of objects or variables that will be tested or hold the result of these tests.
- **Act**: In this portion of a unit test, the code being evaluated is called
- **Assert**: In this portion of a unit test, the results of the "Act" are tested to see if the result matched expectations.
Tests are a way for the development team to verify that units of code work the way they are expected to. Tests do not add anything to the unit's functionality or capability. Tests should not be deployed with the application code. In IntelliJ, a project should have a separate tests folder that is apart from the application source folder (typically *src*), and it should be marked as a ***test source root***.
There are several libraries that can do unit testing, and none are included in the Java SDK. The most popular one is ***JUnit***. The current version of JUnit is version 5. It is not part of the standard Java SDK, so it must be added to your available libraries and then imported into your test classes.
## Create Unit Tests
A comprehensive guide to testing in IntelliJ is available here.
### Set Up JUnit
First, add JUnit to your project by following these steps
- Open your project in IntelliJ.
- Open the project structure settings (File > Project Structure).
- Go to the "Libraries" section and click the "+" button to add a new library.
- Select ***Maven***
- Search for *org.junit.jupiter*: and select the newest JUnit version
- Example: org.junit.jupiter:junit-jupiter:5.11.0-M2
- Be sure the Transitive Dependencies box is checked, and optionally the Javadocs box.
- Click "OK" to add the JUnit library to your project.
- Close the Project Structure window
### Create a Test Sources Root
Next, right-click on the project and select New > Directory and name the new directory *tests*. Then right-click on the new directory and go to Mark Directory As and from the menu that pops out select Test sources root. The tests folder should now be green.
Creating a test sources root folder makes it easy to separate the tests from the application source code when deploying the application.
### Create a Test Class
As soon as a new class is added to a project, a new test class should also be added. Whenever a method is created in the class, the corresponding tests should also be written at the same time.
To create a test class, do the following:
1. In the project view, right-click on the tests directory.
2. Select New > Java Class and provide a name for your test class
- Each class in the application should have its own test class. All tests of the class should live in this file.
- A common naming convention is *ClassNameTest* (example: *ShoppingCartTest*)
3. Make sure this class is located under the test root directory.
### Write Tests
Once a test class is created, the next step is to write one or more tests. In the test class, add the Junit import at the top of the file.
Code Example: Import Junit
```java
import org.junit.jupiter.api.*;
```
Next, create a test method, give it a name that describes what is being tested, and annotate it with *@Test*. All tests should be public, return void, and have no parameters. In the test method write your test following the Arrange, Act, Assert pattern.
This design pattern describes the three steps any unit test should take. In the arrange step objects and variables are created and initialized. This may be done for a group of tests using a test fixture in some cases. In the act step, the unit of code being tested is called. This could be creating an instance of an object, calling a method or function, or something similar. The assert portion then involves testing the results against expectations. If the code did what was expected the test should pass, and if it didn't do what was expected then the test should fail.
Understanding what to test and what the expected results ought to be is challenging. For example, if a method is returning a collection, testing the size of the collection returned may be adequate, or testing what each element in the collection is may be necessary. If a method can throw an exception, the act portion of the test can cause the exception to be thrown and the test can assert that the exception was thrown.
How much testing is needed depends in part on what the application code is being used for. If it involves large financial transactions or human safety, then a tremendous amount of testing should be expected to ensure the code works in as many different circumstances as possible. If it is for a small personal project, then it likely warrants much less (but not zero) testing.
### Generating Tests
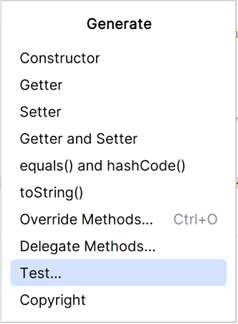
A good developer environment can generate boilerplate code such as the structure of unit tests. In IntelliJ, simply right-click on a class or method, and select Generate, and from the pop-up menu select Test...
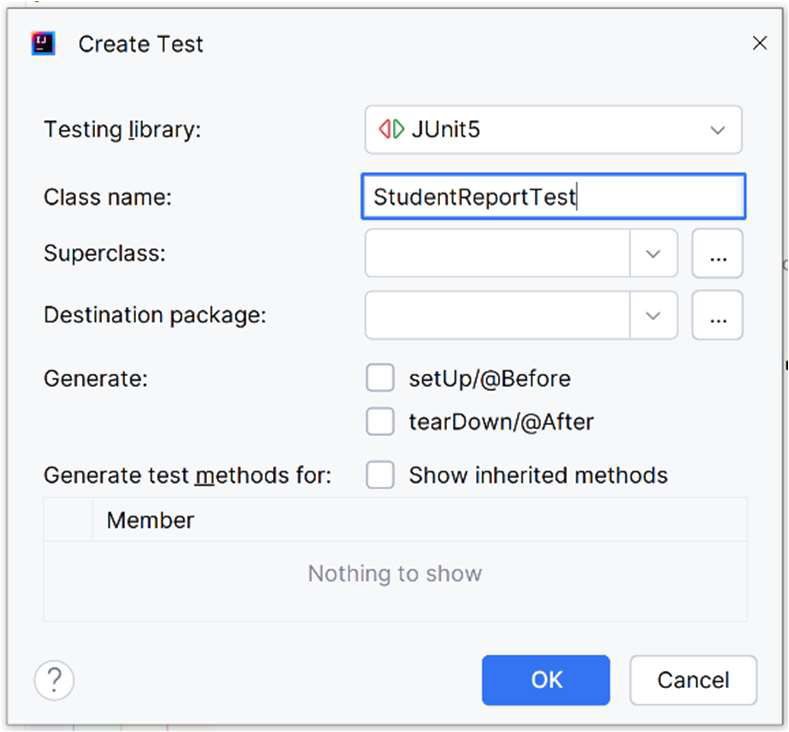
A pop-up window should appear that will allow you to configure the test class and which methods will have tests generated. The generated class will have the needed import statements for your testing library, as well as test methods for the selected class methods. These will not have any code in the body, it's still up to the developer to create the test.
Figure 3.4 Generate Tests
Figure 3.5 Create Test
## Axioms
An ***axiom*** in mathematics and logic is the basic premises or rules upon which a theory or system is built. They are considered obvious truths that are not derived or calculated in any way. Axioms are simply accepted as given.
Defining correct behavior of an object in terms of axioms helps define what a test should look for. Consider the ArrayList class in the Java SDK. This object holds a collection of other objects and can perform several actions, such as reporting how many elements are in the collection, if it is empty, adding and removing objects, and searching the collection. Here are some examples of ArrayList axioms and the corresponding unit test:
Code Example: A newly instantiated ArrayList is empty.
```java
@Test
void newArrayListSizeTest()
{
// Arrange
ArrayList list = new ArrayList<>();
int size;
// Act
size = list.size();
// Assert
Assertions.assertEquals(0, size);
}
```
Code Example: The isEmpty() method will return true if the size is zero, and false if the size is greater than zero. It is not possible for the size to be less than zero.
Code Example: Indexes always start at zero and go up.
```java
@Test
void arrayListIndexTest()
{
// Arrange
ArrayList list = new ArrayList<>();
Integer first;
Integer second;
// Act
list.add(Integer.valueOf(1));
first = list.get(0);
list.add(Integer.valueOf(2));
second = list.get(1);
// Assert
Assertions.assertEquals(1, first); // Relying on the autounboxing of Integers
Assertions.assertEquals(2, second);
}
```
Code Example: When adding an element to an ArrayList, the size should go up by one.
```java
@Test
void arrayListSizeIncreasesTest()
{
// Arrange
ArrayList list = new ArrayList<>();
int firstSize;
int secondSize;
int thirdSize;
// Act
list.add(Integer.valueOf(1));
firstSize = list.size();
list.add(Integer.valueOf(2));
secondSize = list.size();
list.add(Integer.valueOf(3));
thirdSize = list.size();
// Assert
Assertions.assertEquals(1, firstSize);
Assertions.assertEquals(2, secondSize);
Assertions.assertEquals(3, thirdSize);
}
```
Code Example: When adding an element without specifying the index number, the element will be added to the end of the ArrayList at the next available index.
Code Example: When adding an element at a specific index number, the element will be added at that index. This shifts the element currently at that position (if any) and any subsequent elements to the right and adds one to their indices.
Code Example: When removing an element from the ArrayList, the size should go down by one.
```java
@Test
void arrayListRemoveDecreasesSizeTest()
{
// Arrange
ArrayList list = new ArrayList<>();
int size;
// Act
list.add(Integer.valueOf(1));
list.add(Integer.valueOf(2));
size = list.size();
list.remove(0); // remove and return index 0, value 1
// Assert
Assertions.assertTrue(size > list.size());
}
```
Code Example: When clearing an ArrayList, the ArrayList will be empty and have a size of zero, regardless of what the ArrayList had before clearing it.
Code Example: If a duplicate object is added to an ArrayList, the size will go up by one and the object will be added to the collection again.
```java
@Test
void arrayListDuplicateAddedTest()
{
// Arrange
ArrayList list = new ArrayList<>();
int firstSize;
int secondSize;
int thirdSize;
// Act
list.add(Integer.valueOf(1));
firstSize = list.size();
list.add(Integer.valueOf(1)); // same state
secondSize = list.size();
list.add(list.get(0)); // same reference
thirdSize = list.size();
// Assert
Assertions.assertTrue(firstSize < secondSize);
Assertions.assertTrue(secondSize < thirdSize);
}
```
It may seem odd to write tests for a class in the Java SDK, but this is a class most are quite familiar with and so its functionality does not need to be explained. Obviously this is not an exhaustive list but gives a good example of some axioms about the ArrayList object's behavior and how to test them.
# Best Practices for Testing
Tests should follow a few basic guidelines for best practices. This includes having several small tests that each test one thing instead of having a few tests that each test many things. For instance, if a single test executes every line of a class in one test and fails, a developer only knows there is a problem in that class. In contrast if there are separate tests for every method or even every path through a method it is much easier to isolate where the bug may be.
Consistently and accurately naming tests helps identify what is being tested by a particular unit test. Having a good naming convention such as *[unitName]Test* or *Test[unitName]* is a good practice. Ultimately it doesn't matter what convention is used if they all stick to the same convention for consistency.
While it would be nice if every single line of code was subjected to tests, this isn't realistically possible. How much of the code is tested is referred to as code coverage and is represented as a percentage. Between 70% and 80% code coverage is generally considered a good target.
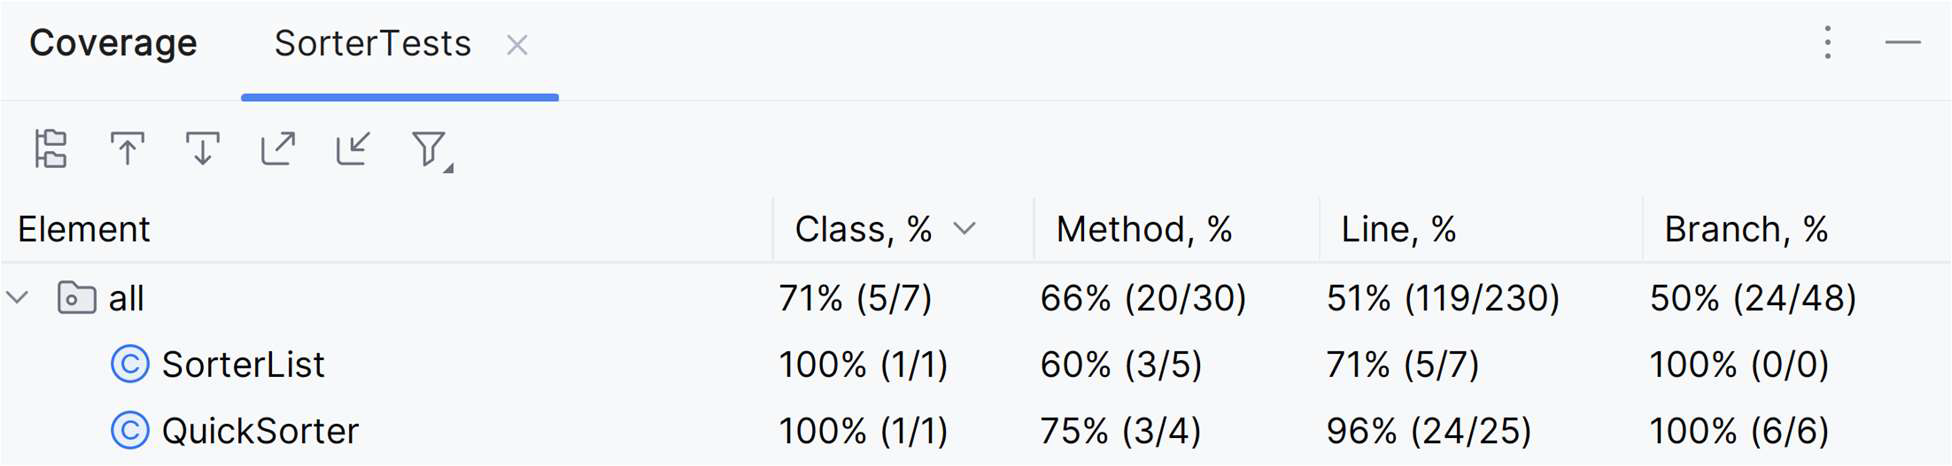
To see code coverage in IntelliJ, right-click on a test class and go to More Run/Debug > Run 'TestClassName' with Coverage. This will show a dialog with each class, showing the Class %, the Method %, the Line %, and the Branch % of coverage.
Figure 3.6 Test Coverage in IntelliJ
## Testing all the class behavior
Good testing involves thinking about not just how the code should work, but also what might break the code. Tests should evaluate the correct path through the code, as well as all edge cases that may be successful or fail and out of bounds or unexpected values. Consider a method that takes an integer, a string, and a list as parameters. Assume the integer must be between 1 and 5, the string must be at least 3 characters long, and the list must have at least one element in it. Ideal test coverage should include:
- The integer is 3, the string is "Hello world" and the list has four elements
- The integer value is 1, the string is "Hello world" and the list has four elements
- The integer value is 5, the string is "Hello world" and the list has four elements
- The integer value is 0, the string is "Hello world" and the list has four elements
- The integer value is 6, the string is "Hello world" and the list has four elements
- The integer is 3, the string is "" and the list has four elements
- The integer is 3, the string is "abc" and the list has four elements
- The integer is 3, the string is null and the list has four elements
- The integer is 3, the string is "Hello world" and the list has one element
- The integer is 3, the string is "Hello world" and the list has no elements
- The integer is 3, the string is "Hello world" and the list is null
What the code does in the invalid situations is a matter of choice for the application designer and development team. Most often in the invalid situations the code would throw an ***exception***. In that case the unit test would call the code and test that the exception was thrown. Another less reliable but somewhat common alternative is to return a sentinel boolean, true if successful and false if not. Tests in this case would simply compare the return value to the expected value.
A sentinel value could be ignored in the application, whereas an exception cannot be ignored.
</section>
## Unit Testing Guidelines
Each unit test should be able to run in any order or be run by itself. This means that no test should depend on another test passing or failing before it runs. The goal of any unit test is to test the unit in question and nothing else.
Testing how the components interact with each other is known as integration testing.
Tests should not be deployed with the application. This is most often done by putting the tests in their own folder separate from the main application's source code folder.
If a unit of code depends on an outside component or service, these should be ***mocked***. Mocking involves creating fake or simulated objects that mimic the behavior of real dependencies, such as databases, web services, or other classes/modules. These mock objects are used as replacements for the actual dependencies during the unit test execution.
Using mocked objects or dependencies lets you test situations such as the dependency being unavailable. Such a thing should be a rare exception. Mocking also ensures that if the dependency is temporarily unavailable, your tests will still work the way they should. Also, if what you are connecting to is a pay-as-you-go service, they also prevent incurring costs for running tests.
Imagine if your code called an external web service and that service was temporarily offline. All your tests would fail even though your code was correct! Imagine also that you wrote code to handle this situation, but the service is online – how would you test that? Mocking allows all these situations to be reliably tested when the real-world environment doesn't match these situations.
## Enhancing Tests
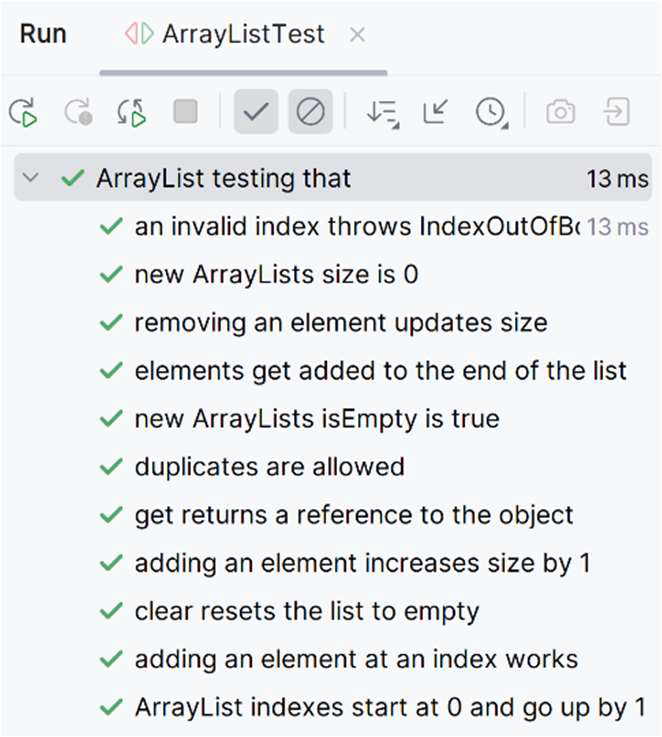
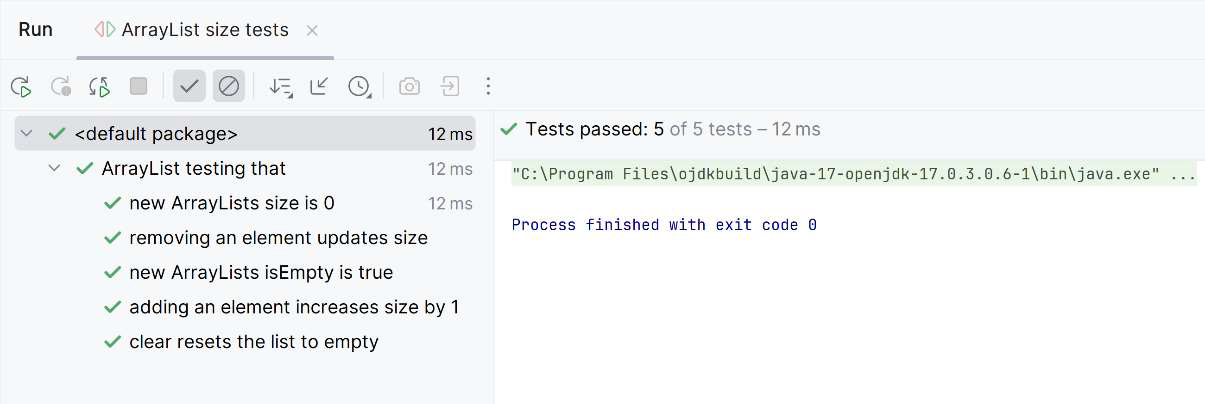
A more user-friendly name can be provided at the class and method level using the *@DisplayName* annotation. These two will be concatenated when the tests run, and this is what is displayed in the test runner. In this example the result is "ArrayList testing that new ArrayList size is 0". These provide a more friendly description when the tests are executed.
Code Example: @DisplayName annotation
```java
@DisplayName("ArrayList testing that")
public class ArrayListTest
{
@Test
@DisplayName("new ArrayList size is 0")
public void newArrayListSizeTest()
{
...
}
...
```
Figure 3.7 Unit Tests with @DisplayName configured
Tests can be grouped together using ***tags***. Once grouped together, it is then possible to run or ignore a subset of all the tests in a project. To add a tag to a test method, add the *@Tag* annotation. This requires a single parameter of the tag name, which cannot be null or blank. Tag names also cannot have whitespace characters after being trimmed, cannot contain ISO controller characters, or any reserved characters. Reserved characters include:
- ,: comma
- (: left parentheses
- ): right parentheses
- &: ampersand
- |: vertical bar or pipe
- !: exclamation point
A test class or method can have more than one tag, effectively putting the class or method in more than one group.
Code Example: @Tag annotation
```java
@DisplayName("MyObject test of")
@Tag("MyObject")
public class MyObjectTest
{
@Test
@DisplayName("constructor")
@Tag("Constructor")
public void MyClassConstructorTest()
{
// Arrange
MyObject obj = new MyObject();
int result = 0;
// Act - This presumes that someMethod returns an int
result = obj.someMethod();
// Assert - assumes 3 is the expected result
Assert.assertEquals(3, result);
}
@Test
@DisplayName("parameterized constructor")
@Tag("Constructor")
@Tag("Parameters")
public void MyClassParameterizedConstructorTest()
{
// Arrange
// Act
// Assert
}
}
```
## Test Fixtures
If a suite of tests uses an instance of the same object type multiple times (If every test’s arrange section creates the same object for instance), it can be useful to set up a test fixture. In JUnit 5, you can use the following annotations to set up and tear down test fixtures:
- *@BeforeEach* is used to mark a method that should be executed before each test method in a test class. This method is typically used to set up the test fixture or any necessary resources before each test case is executed.
- *@AfterEach* is used to mark a method that should be executed after each test method in a test class. This method is typically used to clean up or tear down the test fixture or resources after each test case is executed.
Code Example: @BeforeEach and @AfterEach annotations
```java
import org.junit.jupiter.api.*;
public class ArrayListTest
{
private ArrayList list;
@BeforeEach
void setUp()
{
// Set up test fixture
list = new ArrayList<>();
}
@AfterEach
public void tearDown()
{
// Tear down test fixture
list = null;
}
@Test
public void newArrayListSizeTest()
{
// Act and Assert combined
Assertions.assertEquals(0, list.size());
}
...
}
```
In addition to these methods that run just before and just after each test, JUnit also has two annotations that will run once before all tests in the class are executed, and once after all tests are executed. They are:
- *@BeforeAll* which is used to mark a static method that should be executed once before all tests in the test class. This method is typically used to set up shared resources or initialize any shared state required by all tests in the class.
- *@AfterAll* which is used to mark a static method that should be executed once after all tests in the test class. This method is typically used to clean up or tear down shared resources or shared state used by all tests in the class.
Code Example: @BeforeAll and @AfterAll annotations
```java
class MyObjectTest
{
static SomeSharedResource sharedResource;
@BeforeAll
static void setUpClass()
{
// Set up shared resource
sharedResource = new MySharedResource();
}
@AfterAll
static void tearDownClass()
{
// Tear down shared resource
sharedResource = null;
}
}
```
Some examples of using this might be setting up a database connection and then closing it, or reading data from a file and then closing the file stream.
By using these annotations, you can ensure that the test fixture or resources are properly set up and torn down before and after each test method or the entire test class, respectively. This helps maintain a consistent and clean testing environment and helps ensure each test starts from a known standard configuration.
## Run tests
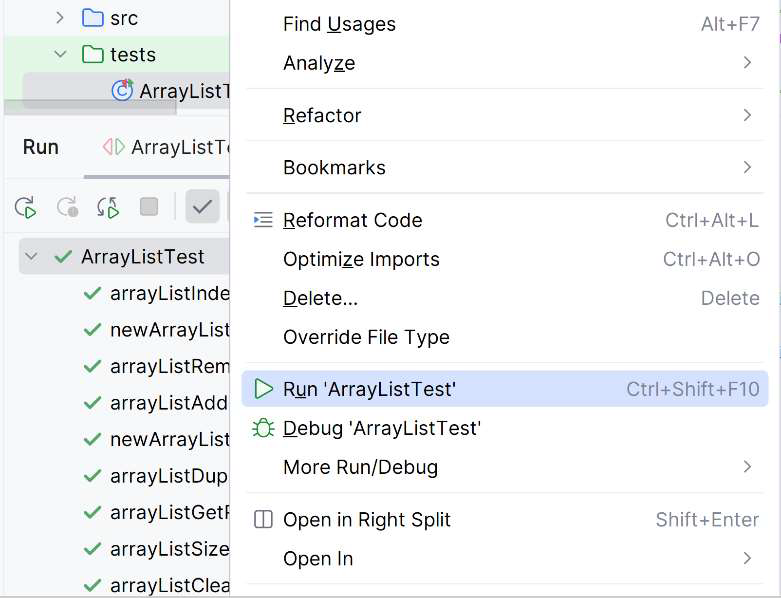
The hard part is over once the tests are written. To run the tests, just right-click on the test class or method in the project view and select Run ‘[ClassName]Test’. IntelliJ will run the tests and display the results in the "Run" tool window. The true power of unit tests is in how fast and easy it is to re-run them once created. Selecting a specific test class to run from IntelliJ is also possible. Expand the test source root folder and select the test class to run. Right click on the test class and select Run '[TestClassName]' from the menu.
Figure 3.8 Running all tests in a test class
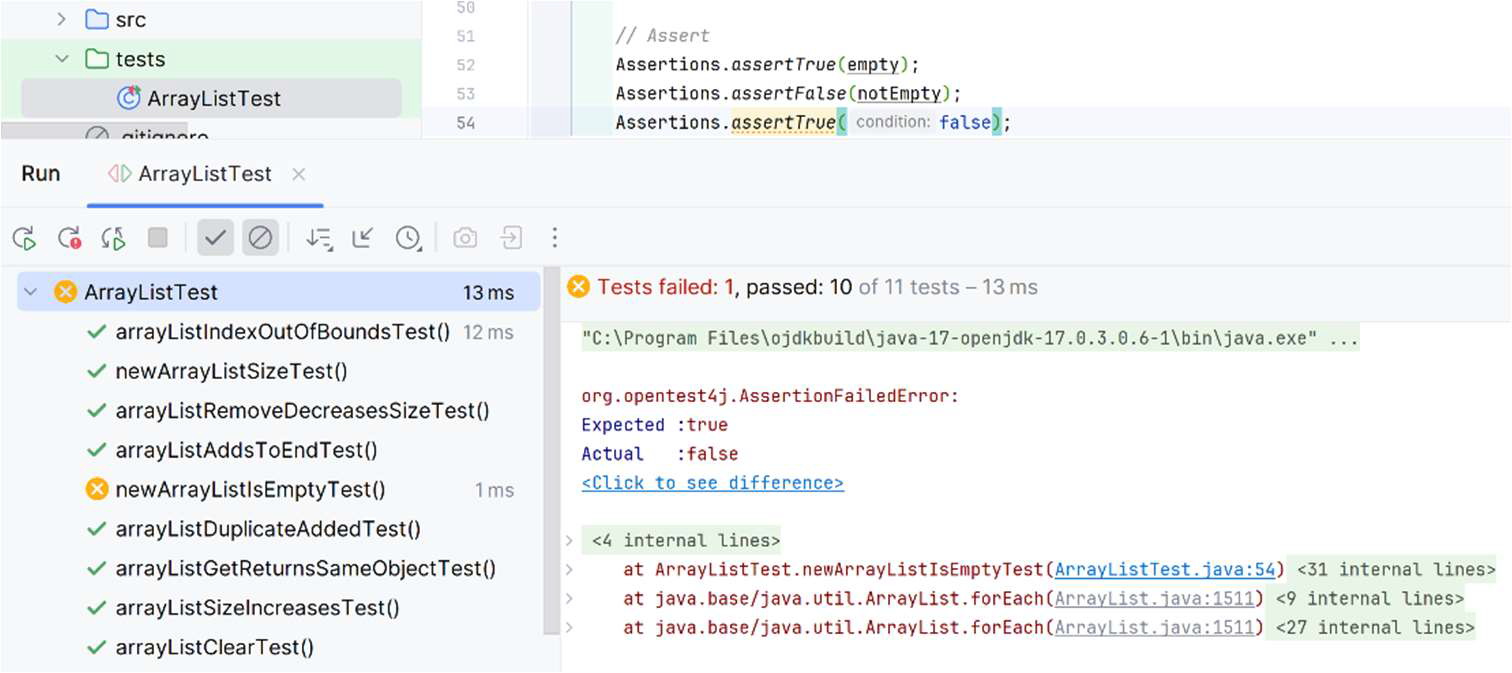
IntelliJ will display the test class, and under it each individual test. A green check beside the test indicates that a test passed. If a test fails, instead of a green check mark, an orange circle with an X will show up next to the test class name and test that failed. The output on the left pane shows what was expected, what happened, and includes the line in the test class that caused the failure. These help the developer identify what went wrong quickly. In the example pictured below, the test failure was created by the line `Assertions.assertTrue(false);` on line 54 in the test class, and the output window indicates exactly where the problem is:
Figure 3.9 Output of a failed test
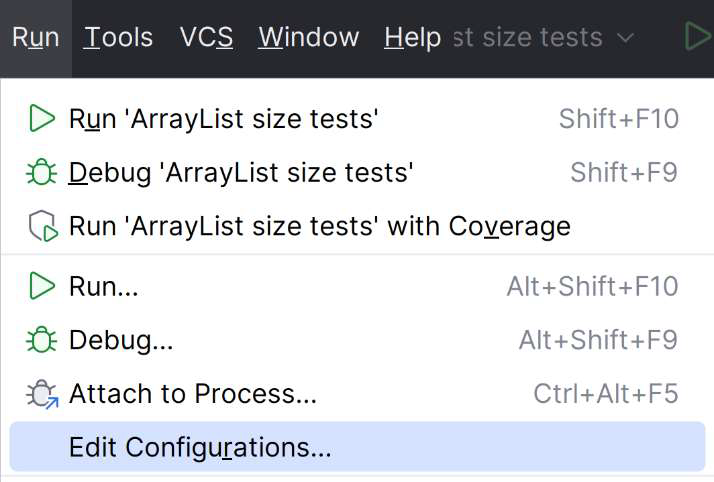
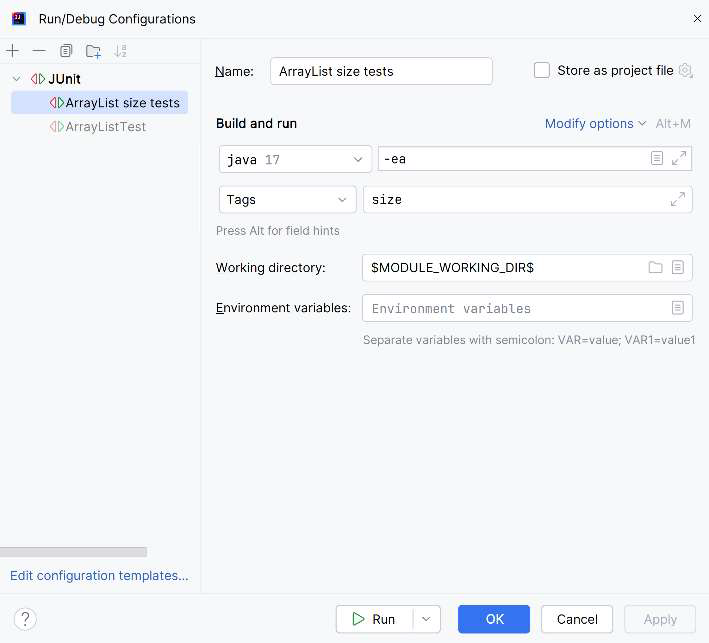
Only running some of the tests is also possible. Once tests are tagged, configure IntelliJ with a new run configuration by selecting the Run -> Edit Configuration menu as pictured. This will open a new dialog window. To add a new configuration, click the large + icon on the top left, and select JUnit.
Figure 3.10 Editing the test’s Run Configuration
Fill in the form fields as shown on the right, giving the configuration a name that describes the configuration, then select Tags and putting the name of the tag or tags in the text input just to the right. Once completed, click the OK button to save the configuration. Here is an example configuration for running ArrayList tests that run the tests with *@Tag(“size”)*:
Figure 3.11 Running tagged tests
Notice that the configuration here says size, not “size” as is written inside the @Tag attribute.
If the quotation marks are added here, the tests will not be found.
To run just these tests, select this new configuration from the top bar of IntelliJ, and click the green triangle Run button:
Figure 3.12 Running a test profile
Running this custom configuration will cause only the unit tests with the correct tag to execute, as seen here:
Figure 3.13 Results of running a test profile
## Quick Review
By isolating and testing individual units, unit testing helps ensure that the building blocks of an application work correctly before integrating them into larger components or the entire system. It promotes modular design, improves code quality, and facilitates easier maintenance and refactoring.
# Refactoring
***Refactoring*** in software development refers to the process of restructuring and improving the existing code without changing its external behavior or functionality. This basically means the method signatures and method returns do not change but the code inside the method does. The main reason code gets refactored is to enhance the quality and maintainability of the codebase.
Refactoring often improves the readability or understandability of the code by improving its structure, naming conventions, and organization. It is also done to improve the speed of the application, fix duplications, update dependency versions, and fix other issues that accumulate over time.
Before refactoring it is important to have good test coverage of the existing codebase. Since the external functionality is not changing, unit tests should all pass before and after the refactoring without the tests, method returns, or method signature being changed. Since other classes and parts of the application already use the existing behavior or functionality, these tests help ensure the rest of the application will keep running after the code is rewritten.
# Advanced Topics
## Parameterized Tests
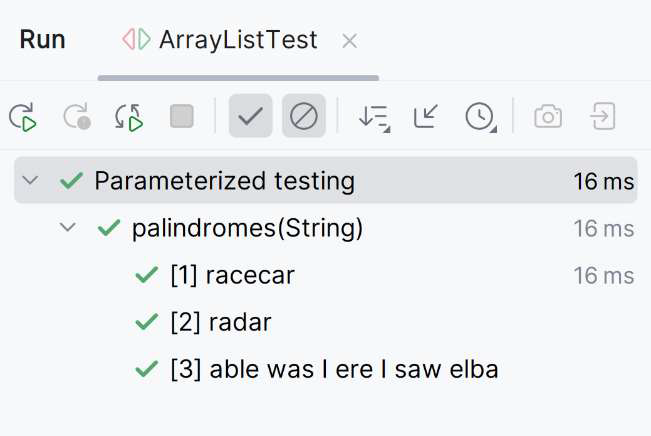
Methods in a class will often require at least one parameter. JUnit 5 offers parameterized tests to run one test multiple times but with different arguments. These tests are declared just like regular *@Test* methods but use the *@ParameterizedTest* annotation. This will require two additional import statements:
Figure 3.14 Results of running a parameterized test
Code Example: Import statements for parameterized tests
Code Example: Parameterized test from the JUnit 5 documentation
```java
@ParameterizedTest
@ValueSource(strings = { "racecar", "radar", "able was I ere I saw elba" })
void palindromes(String candidate)
{
assertTrue(StringUtils.isPalindrome(candidate));
}
```
When running a parameterized test, it will run once for each parameter and each execution will be reported separately.
## Test Automation
Test automation refers to using specialized software tools and scripts to run tests without human interaction. This process automatically builds the software from the latest version of the source code and then runs the configured tests.
The primary purpose of test automation is to improve the efficiency, accuracy, and coverage of software testing by:
- Increase testing frequency and reduce execution time.
- Ensure consistent and repeatable test execution.
- Enhance test coverage by running a large number of test cases.
- Facilitate regression testing after code changes or updates.
- Improve the overall quality of the software product.
Being able to quickly re-run tests in IntelliJ is just the beginning. This can be taken a step further using a setup commonly called ***Continuous Integration***, or **CI** for short. Continuous Integration is almost always the first part of the ***DevOps*** cycle. In a team environment where multiple developers are simultaneously working on different parts of the source code, tools such as these reduce the need for manual testing and the likelihood of an error going uncaught. Automating the process allows for continuous testing, faster feedback loops, and improved software quality.
DevOps is short for Developer Operations and refers to the process of Continuous Integration and Continuous Delivery or Deployment. It is a popular software development practice that automates the entire process of building, testing, and deploying applications. Automating the testing process is vital to not releasing broken software.
The test automation process is typically one step in a larger process. It is most common in a DevOps ***Continuous Integration/Continuous Delivery (CI/CD)*** environment where software is built and tested automatically, and if these are successful then the application is ready to deploy or may even be deployed. Tools for CI/CD include GitHub Actions, Jenkins, Travis CI, Circle CI, and many others.
# Summary
Testing is a vitally important activity in high quality software development. Comments and documentation are a vital part of high-quality code, because they help developers understand the intent of the code being examined. There are many kinds of tests that validate different aspects of an application, and each have their place. The most basic tests involve using the debugger to manually execute code line by line and writing unit tests. Unit tests should always follow the Arrange, Act, Assert pattern. Creating Axioms, or statements that should always be true about the code in question, is an excellent place to start planning unit tests.
Having these written as code in the form of unit and integration tests allows quick and easy re-testing of the code. This is important when new features and functionality is added, and when code is refactored. The amount of code tested by unit tests is known as code coverage. Tests should exercise the code using expected values, edge case values, and invalid values. Having 80% code coverage is a good industry standard goal for most applications. A few rules for good unit testing include that no test should depend on another test to succeed or fail, and tests should be able to run by themselves or in any order. Tests should follow a standard naming convention in a project for consistency and predictability.
There is no integrated library for testing in the JDK, but there are excellent libraries available, such as JUnit. JUnit has many features that can enhance unit tests, such as tags, display names, and parameterized tests. JUnit can be added to a project using an online repository platform such as Maven. Fortunately, IntelliJ has excellent support for both Maven and JUnit built in. Tests should also be kept in their own folder in the project, which should be marked as a test source root folder. This helps ensure tests will not be deployed with the application.
# Review Questions
1. Why is software testing an essential part of development?
2. What is the difference between functional and non-functional testing?
3. How do black box and white box testing differ?
1. What is the primary purpose of unit testing?
2. How does integration testing differ from unit testing?
3. What is acceptance testing, and who performs it?
1. What is the goal of stress testing?
2. How does usability testing benefit an application?
3. Why is security testing crucial in software development?
1. What is regression testing, and why is it necessary?
2. How does smoke testing help in software development?
3. What is the main goal of exploratory testing?
1. What is code coverage, and why is it important?
2. Why is 100% code coverage often unrealistic?
1. What makes a good code comment?
2. How do code comments help in debugging?
1. What are the key steps in debugging software?
2. How can debuggers help identify software issues?
3. What are some common debugging tools?
1. What is the Arrange, Act, Assert pattern in unit testing?
2. Why should unit tests be kept separate from application source code?
3. What is an axiom in unit testing, and why is it useful?
1. Why should tests be small and focused?
2. What is the recommended level of code coverage?
3. What is mocking, and why is it useful in testing?
1. What is a parameterized test?
2. What is test automation, and what are its benefits?
3. How does Continuous Integration (CI) improve software testing?
4. What is DevOps, and how does it relate to automated testing?