Module 9: Application Deployment
Introduction
“Our highest priority is to satisfy the customer through early and continuous delivery of valuable software.”
Principles behind the Agile Manifesto
Deploying software, also called shipping software, is the process of making the software application available and operational for users. Deployment is a crucial step in the software development life cycle because it transitions software from development to production, where the software will run on its own, not just through the development environment’s debugging interface.
Learning Objectives
- Building and Running Java Applications
- Packaging a Deployment
- Running a JAR File
- Advanced Topics
- Summary
Building and Running Java Applications
Throughout the book to this point the only way an application has been executed is through the IntelliJ debugger. This is a great convenience for software developers to quickly try out the latest code they have developed but this is not a practical or secure way to run software for regular users. Instead, the software should be bundled into a package that can execute outside of the developer environment and that can be easily distributed to users. This process is called deploying software to production.
The process of building and deploying a Java program consists of several distinct steps, which include writing the source code for the application, compiling the source code into Java bytecode, building a deployment package, and then running the package. The Java build process primarily involves compiling source code to bytecode while the run process involves the JVM loading, verifying, and executing the bytecode.
Developers write a Java program in a text editor or an IDE such as IntelliJ. The code is saved in a file with a .java extension, and the filename should match the public class name in the file. The Java source code (.java file) is compiled using the Java compiler. In IntelliJ, this is done by selecting the Build -> Build Project menu or using the keyboard shortcut CTRL+F9. Alternatively, the command-line tool javac can be called directly. The compiler translates the human-readable Java code into platform-independent bytecode. Each class in the source file results in a separate .class file containing the bytecode.
Next, a deployment package is built. This involves resolving dependencies such as external libraries or resources such as image files or data files. The application’s resources and compiled classes are then put into a JAR file. A JAR file is a special kind of zip file for Java applications.
This JAR file is then distributed to end users by installing it on their computer. The packaged JAR file is then executed by the Java Virtual Machine (JVM). The JVM is platform-specific but executes the platform-independent bytecode, ensuring Java’s “write once, run anywhere” capability.
When the program is executed, the JVM processes the bytecode in three main stages. First, the class loader loads the necessary .class files into memory. Once copied into main memory the JVM can work with them directly. Next, the bytecode verifier checks for illegal code that could violate access rights or corrupt memory. Assuming the bytecode verifier passes all checks, then the JVM compiles the bytecode to native machine code at runtime for better performance. This is called Just-In-Time Compilation (JIT), and is a key component in Java’s write once, run anywhere technology. Because of this though, Java applications are not stand-alone applications but must have a JRE installed on the system for the application to run.
Packaging a Deployment
Building an application converts the java source code (.java files) into byte code (.class files). Applications consist of many classes though, and all the .class files need to be in place before the application can run. Manually copying over each individual class file to every computer the application will run on would be tedious and impractical. Fortunately, an alternative exists to bundle these together for easier deployment.
JAR Files
The Java ecosystem uses a bundled package format known as a Java Archive, or JAR file. A JAR file packages multiple Java class files, resources, and metadata into a single compressed file, making distribution and deployment easier. Building a JAR file consists of first compiling Java source files into .class files. For the JRE to know which class has the static main method, a configuration file called a Manifest File is created. This tells Java which class will start the application and provides other metadata about the application. Without the manifest file, a JAR file is in reality just a zip file of compiled .class files. Having a manifest file is what makes it possible to execute a JAR file.
A manifest file specifies the entry point (the class with the main method). The manifest file should be in a folder called META-INF, should be named MANIFEST.MF, and should contain the following text:
1. Manifest-Version: 1.0
2. Main-Class: YourMainClass
3.
Replace YourMainClass with the fully qualified name (including package, if any) of the class containing your public static void main(String[] args) method.
Adding Resources to a JAR
It is possible to include directories in an executable JAR file. The JAR format supports storing entire directory structures, including subdirectories and their contents. This is commonly used to package resources (such as images, configuration files, or data files) alongside your compiled Java classes.
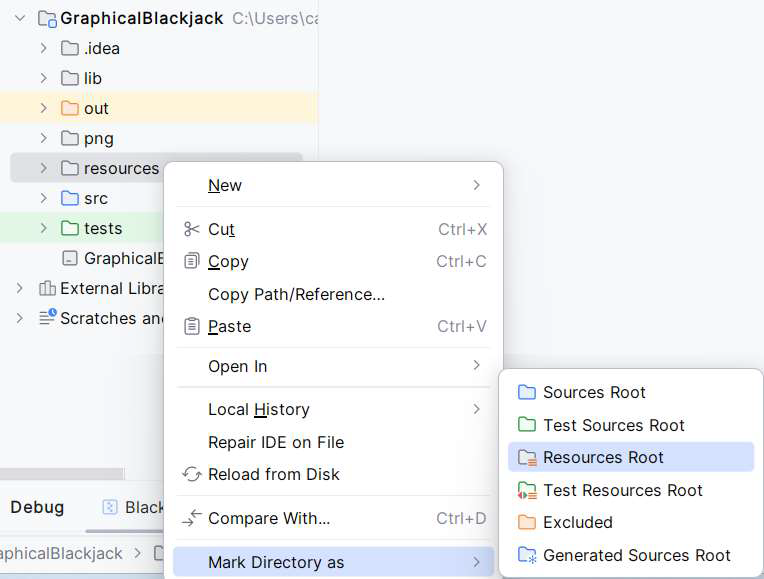
When creating your JAR, any directory you specify will be included recursively. In IntelliJ, rightclick on a folder and mark the directory as a resources root folder.
Once included, directories and their files are accessible as resources via the classpath. Use Class.getResource() or ClassLoader.getResourceAsStream() to read files from within the JAR. This approach is standard practice for Java application packaging and is fully supported by the JAR specification.
Best Practices for Organizing Resources in an Executable JAR File
- Place resources in a dedicated directory: Store all non-code files (images, configuration files, properties, XML, etc.) in a dedicated resources directory, typically named resources or similar.
- In Maven or Gradle projects, use
src/main/resourcesfor production resources andsrc/test/resourcesfor test resources
- In Maven or Gradle projects, use
- Preserve package structure: Organize resource files in subdirectories that mirror your Java package structure if they are closely tied to specific code packages. This makes resource loading more intuitive and avoids naming conflicts.
- For example, if your class is in com.example.app package, you might place a resource in
src/main/resources/com/example/app
- For example, if your class is in com.example.app package, you might place a resource in
- Access Resources Using ClassLoader Methods: Always load resources using Class.getResourceAsStream() or ClassLoader.getResourceAsStream() rather than treating them as files. This ensures compatibility whether the resource is inside a JAR or on the If using build tools like Maven or Gradle, placing files in src/main/resources ensures that the entire directory structure is included in the resulting JAR. file system. Do not use absolute or platform-dependent file paths for resources. Always use relative paths and classpath-based access methods.
InputStream in = getClass().getResourceAsStream("/com/example/app/config.properties");
- Keep META-INF and Manifest Files at the root: The META-INF directory and its MANIFEST.MF file must remain at the root of the JAR, as required by the JAR specification.
- Use Build Tools for Packaging: On large projects, it is best to use build tools such as Maven or Gradle to automate copying resources into the correct locations in the JAR. This ensures consistency and reduces manual errors.
- Document or Manifest Resource Listings (Optional): If your application loads multiple resources dynamically, consider including a manifest or index file listing all resource names. This can simplify resource discovery at runtime.
- Avoid Deeply Nested or Unintuitive Structures: Keep the resource directory structure logical and not overly deep. Group related resources together for clarity and maintainability.
By following these best practices, your executable JAR will be organized, maintainable, and compatible across different environments and build systems.
Building a JAR
Building a JAR file can be done using commands from the JDK. In addition, IntellIJ provides an effective way to build and run JAR files from a project. The steps to create a JAR file from IntelliJ are:
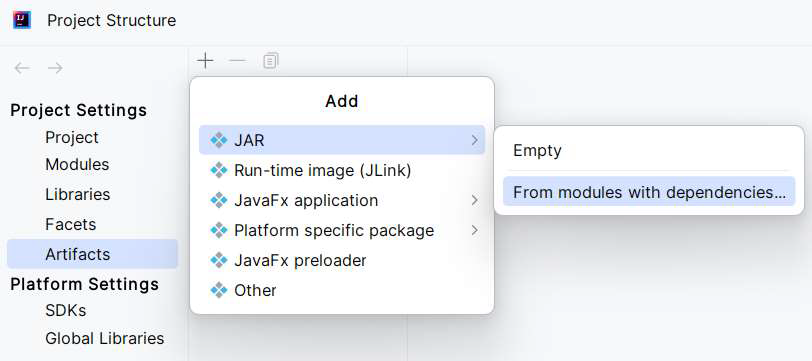
- Go to File -> Project Structure (or press Ctrl + Alt + Shift + S), and click Artifacts
- Click the Add button ( + ), point to JAR, and select From modules with dependencies
- To the right of the Main Class field, click the Browse button and select the main class in the dialog that opens (for example, Application)
- IntelliJ IDEA creates the artifact configuration and shows its settings in the right-hand part of the Project Structure dialog.
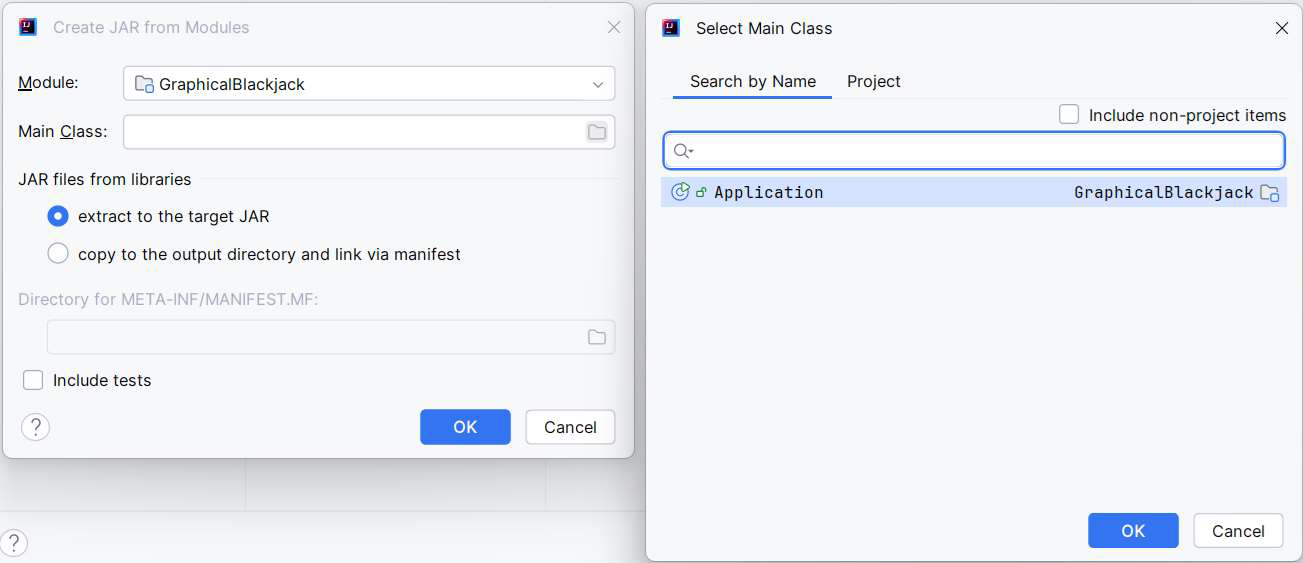
- Select extract to the target JAR
- Do not click include tests
- Click OK to apply the changes and close the dialog.
An animated graphic and a description of this process is available on JetBrain’s website
Build the Executable JAR with the Manifest
From the IntelliJ main menu, go to Build -> Build Artifacts. Point to the created .jar and select Build.
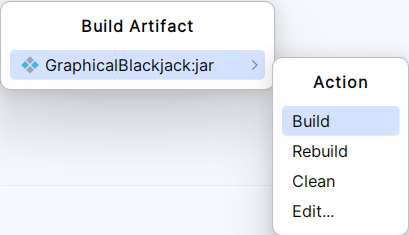
The resulting JAR file should be created in the out/artifacts folder. This process will also create the META-INF folder and the MANIFEST.MF file for the project.
When you’re building a project, resources stored in any directory marked as a resources root are copied into the compilation output folder by default. If necessary, you can specify another directory within the output folder to place resources.
Adding Dependencies to a JAR
There are two types of dependencies that an application may need included in a JAR. These are local project resources such as image files or configuration files, and external resources such as 3rd party libraries. To add dependencies to an executable JAR file, it is necessary to create what is known as a “Fat JAR” or “Uber-JAR” where the JAR file bundles your code and all its dependencies into a single JAR file. This approach makes it easy to distribute and run your application anywhere without worrying about the accessibility or version of these dependencies.
To create a JAR file that includes other JAR files, open the project if it is not already open in IntelliJ. Go to File -> Project Settings. On the Project Settings window, select Artifacts. Click the + to add a new Artifact. On the pop-up window, select Jar -> From modules with dependencies. This will open a new window. On the Main Class field, click the folder on the input field and browse to the class that holds the static main method, and select it. Select the radio button that says extract to the target JAR and click OK.
Once the new artifact profile is created, click Apply, then OK. Go to the main menu and select Build -> Build Artifact. Select the artifact profile name and click Build from the Action menu. This should add an out/artifacts folder to the IntelliJ project explorer. In this there should be a folder with the name of the artifact, and inside this folder the Jar file has been created.
To add other resources such as images or configuration files, the best approach is to create a new resources directory in the project’s root folder, and right-click the project, selecting Mark Directory as -> Resources root. When the JAR file is built, anything in this folder will be copied into the JAR file and available to the classes.
These files can be read by Java using the Class object’s getResource() or getResourceAsStream() method. This uses the Java runtime’s current application location as the starting folder. If the application is running as a JAR file, this can load other files from the JAR, but if the application is running through the IntelliJ debugger as normal then it can load other files from the project directory.
Running a JAR File
To ensure the JAR file will work when deployed, IntelliJ can be configured to run the JAR file. Once a JAR file is built and runs successfully through IntelliJ, it can be copied to one or more computers and then executed directly through the JRE on the host computer to run the application. This makes JAR files a very straightforward way to deploy a Java application.
Running Through IntelliJ
IntelliJ can be configured to run the JAR file after it is built. On the main menu, select Run -> Edit Configurations. This will open the Run/Debug Configurations window. Click the + to add a new configuration and select JAR Application. Name the profile, and on the Path to JAR field, browse to the out/artifacts/<BuildName>/ folder and select the JAR file that was just built. Near the bottom of the window, in the Before launch settings, click the + to add a pre-launch task. On the Add New Task menu, select Build Artifact. This will build the latest version of the software as the JAR file before running it
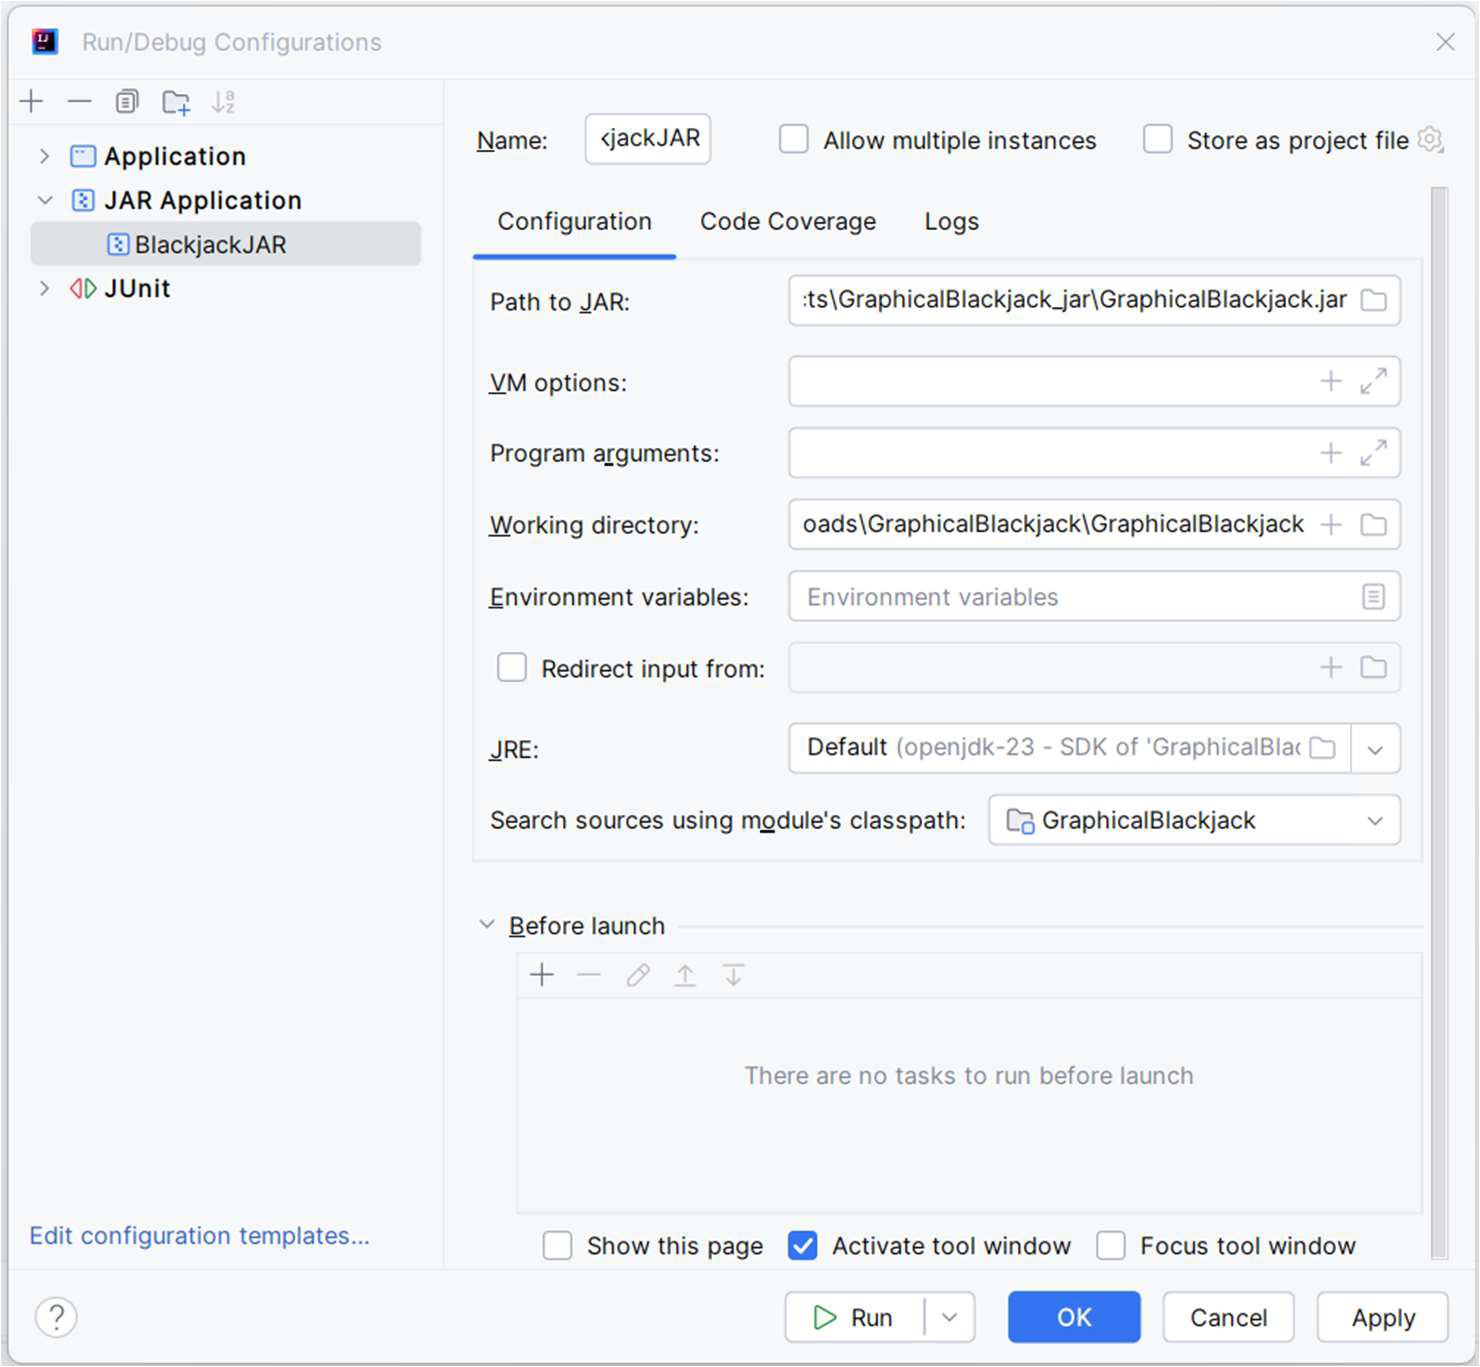
On the main menu bar, just to the left of the run/debug buttons, select the drop-down menu and you should see the name you just input for the new run configuration. Select that. Now, click the Run button. IntelliJ should now build the jar and execute it.

Assuming the application executes with no errors, this JAR file can be copied to other computers with a JRE of the same or a later version installed, and the application can run outside of IntelliJ now.
Running Through the JRE
To run an application from a JAR file without IntelliJ, the java command from the JRE is used. To do this, a user would need to open a command prompt and type the following command:
java -jar <path/to/application.jar>
One common approach to simplifying this is to create a system shell script that will do this so the user can simply double-click the shell script instead of typing the command out every time. For Windows, this would be a batch file, and would look like this:
@echo off
path\\to\\java.exe -jar <path/to/application.jar>
For Linux and Mac, a Bash shell script would be used, which would look like this:
#!/bin/bash
/path/to/java -jar <path/to/application.jar>
Advanced Topics
Stand Alone Applications
To run without the JRE, a different approach known as Ahead-Of-Time (AOT) Compilation would be needed. An application built this way does not require a JRE on the computer, but also cannot run on a different CPU or operating system. Building an AOT Java application is not a standard approach to deploying an application, but it can be done in a couple of ways. Building the application using the Graal JVM makes it possible to build a native application. Alternatively, using a build tool such as Launch4J or JPackage can be used to create stand-alone applications.
Containerized Applications
One of the more recent technological advances in deploying applications is the use of containers. This is typically done using Docker, which allows the application to run consistently across different environments, regardless of the underlying operating system or installed software. Think of a container as a lightweight virtual machine that gives the application its own completely isolated environment to run in.
Containerizing a Java application means packaging the application along with its runtime environment and all dependencies into a single dedicated container. This prevents any version conflicts from having more than one version of Java installed and eliminates any OS specific elements in the operating environment.
Web Applications
Java can be used to create dynamic web applications. One of the most popular ways of running such applications is through the Apache Tomcat web server. Deploying this type of application involves installing and configuring Apache Tomcat, then deploying the code to this server. Users then access the application through a web browser.
Another approach that is possible for deploying a Java application is the WebSwing toolkit. This toolkit wraps a Java GUI desktop app written in Swing or JavaFX into a web application. Using this toolkit makes it possible to deploy a desktop app directly to the web with no code modification. It certainly works, but as someone once famously said, just because you can do something doesn’t mean you should do it!
Signing a JAR File
Digitally signing a JAR file is the process of applying a digital signature to the JAR file using Public Key Infrastructure, or PKI. This lets users verify the authenticity and integrity of the JAR contents. Doing this is a safe and secure way to ensure that the code comes from a trusted source and has not been tampered with since it was signed.
Signing a JAR file this way ensures the JAR was produced by the signer, because only they have the private key in the public/private key pair. This ensures the contents haven’t been modified after signing, which prevents “Unknown Publisher” warnings and boosts user confidence, especially for software distributed over the internet.
Summary
Deploying software refers to the process of making a software application available and operational for end users. In Java, this typically involves compiling source code into bytecode, bundling it into a JAR file, and executing it using the Java Virtual Machine (JVM). Key components of the deployment process include building applications, packaging deployments, managing resources, and running JAR files.
Java applications are written in .java files, compiled into .class files (bytecode), and executed by the JVM. IntelliJ and command-line tools like javac facilitate this process. When deployed, the JVM uses Just-In-Time (JIT) compilation to convert bytecode into machine code at runtime.
The preferred deployment format in Java is the JAR (Java Archive) file, a compressed package containing compiled classes, resources, and a manifest file specifying the entry point of the application. IntelliJ can build these artifacts, and tools like Maven/Gradle simplify resource management.
Resources such as images, properties, and config files should be stored in a dedicated resources directory (e.g., src/main/resources). They should be accessed using the classpath rather than file paths to ensure compatibility inside and outside JARs. Following best practices in organizing these resources ensures scalability and maintainability.
For self-contained applications, all dependencies can be bundled into a single executable JAR (Fat JAR or Uber-JAR), using IntelliJ’s artifact settings.
Applications can be run within IntelliJ or directly via the java -jar command on any system with the appropriate JRE. Shell scripts can simplify command execution on Windows and Unix-like systems.